Docs
Learn How It Works
TI-84 Plus CE Guide
What's New
What’s New in TI-84 Plus CE
CE Calculator File Updates
CE OS v5.7.0
- MathPrint Implicit Multiplication with Negation:
To enhance implicit multiplication, a multiplication sign is now displayed in expressions to avoid confusion.
Example: Enter 3 [(-)] 2
Display shows 3*-2, resulting in -6.
TI-Innovator™ Hub App
- HUB Menu in TI-Basic Program Editor:
Includes support strings for TI-Innovator™ Hub sketch v1.5.
Features:
- Data Collection: Collect multiple data samples in a single command.
- Compound Statements: Synchronize multiple outputs.
- TI-RGB Array: Control multiple LEDs.
- Sound: Play repeated beeps with a single command.
- Ranger: Return “time of flight.”
CellSheet™ App
[Details not provided in the input.]
Language Localization Apps
[Details not provided in the input.]
TI-SmartView™ CE for the TI-84 Family
Emulator Workspace
- The CE emulator now supports the Python App.
Launch the Python App by selecting [prgm] 2:Python App.
Explorer Workspace
- Python Program (PY AppVar):
Saves from the CE to a computer as a *.py file.
Open the *.py file in a text editor to view or edit for the CE Python experience.
As in previous releases, TI-SmartView™ CE and TI Connect™ CE Explorer send/convert .py files to the calculator file type, PY AppVar. - Image Support:
When sending an image from a computer to the CE, you can now send/convert the file as a Python image (AppVar).
Use the Python App and import the ti_image Add-On module to utilize the converted image in a program.
TI Connect™ CE
Explorer Workspace
Python Program (PY AppVar):
Saves from the CE to a computer as a *.py file.
Open the *.py file in a text editor to view or edit for the CE Python experience.
As in previous releases, TI-SmartView™ CE and TI Connect™ CE Explorer send/convert .py files to the calculator file type, PY AppVar.
Image Support:
When sending an image from a computer to the CE, you can now send/convert the file as a Python image (AppVar).
Use the Python App and import the ti_image Add-On module to utilize the converted image in a program.
Using TI-84 Plus CE
Using TI-84 Plus CE Graphing Calculator
The TI-84 Plus CE graphing calculator comes with features like USB cable, large storage, and fast operating memory. It comes with already installed software applications (Apps) which are designed for calculations in pre-algebra, algebra, calculus, biology, chemistry, and physics.
Key Features
- High-Resolution, Full-Color Backlit Display:
It can easily distinguish multiple graphs and plots with color-coded equations, plots, and objects.
You can easily read graphs with customizable grid lines. - TI Rechargeable Battery:
It can be Recharged via USB cable, wall charger, or TI Charging Station CE. - Familiar TI-84 Plus Functionality:
It has the similar menu structure and navigation of the TI-84 Plus family, with enhanced features. - MathPrint™ Functionality:
You can Input and view math symbols, formulas, and stacked fractions as they appear in textbooks. - Image Import and Graphing:
You can use TI Connect™ CE Software to transfer images (.gif, .jpg, .png, .tif, .bmp) from a computer to the calculator.
You can Graph on top of images to connect mathematical concepts to real-world applications.
Pre-Loaded Applications
The following applications extend the calculator’s functionality, enabling the users to solve complex math and science problems with easy understanding of concepts:
- Cabri™ Jr: Interactive geometry application.
- Probability Simulations: Explore probability concepts.
- CellSheet™: Spreadsheet functionality for data analysis.
- Science Tools: Tools for scientific calculations and experiments.
- Conic Graphing: Graph and analyze conic sections.
- SmartPad for TI-SmartView™ CE: Emulator compatibility for classroom use.
- Inequality Graphing: Visualize and solve inequalities.
- TI-Innovator™ Hub: Connect to external devices for coding and engineering projects.
- Periodic Table: Access a digital periodic table for chemistry.
- Transformation Graphing: Explore function transformations.
- Polynomial Root Finder and Simultaneous Equation Solver: Solve polynomials and systems of equations.
- Vernier EasyData®: Collect and analyze data with Vernier sensors.
Turning the TI-84 Plus CE On and Off (Using the keyboard)
Turning the TI-84 Plus CE On and Off
This section explains the basic procedures for powering your TI-84 Plus CE graphing calculator on and off.
Turning the Graphing Calculator On
- Press ON.
An information screen appears with the following options: - Press 1 to proceed to the home screen and skip this screen on future startups.
- Press 2 to proceed to the home screen without changing startup behavior.
- Any selection from the information screen directs you to the home screen (a blank screen).
Additional Information
The information screen displays the following for reference (accessible only from the home screen):
- Press ALPHA + F1–F4 to access shortcut menus.
- Press + on most menu items for Catalog Help.
- A context-sensitive shortcut menu may appear with ALPHA + F5 for interactive features, such as graph screen drawing tools or TI-Basic program editing.
Note: This screen also appears after resetting RAM.
Turning the Graphing Calculator Off
- Press 2ND + OFF.
- The Constant Memory™ feature preserves settings, memory, and clears any error conditions.
- If the TI-84 Plus CE is turned off and connected to another calculator or computer, communication will automatically “wake” it.
Automatic Power Down™ (APD™)
To extend battery life, the APD™ feature automatically powers off the TI-84 Plus CE after approximately 3–4 minutes of inactivity.
- When reactivated, the calculator restores the display, cursor position, and any error messages exactly as they were before APD™.
Using the TI-84 Plus CE Keyboard
Using the TI-84 Plus CE Keyboard
This section describes the functions of specific keys on the graphing calculator keyboard.
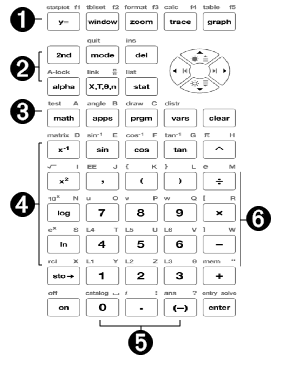
TI-84 Plus CE Keyboard
| 1 | Graph/Plot Setup Keys | allow access to interactive graphing features. When some graph screen features are active, you may see a shortcut menu in the ƒ b location for feature options. |
| 2 | Editing Keys | allow you to edit expressions and values. Paste a MathPrint fraction template to your expression. |
| 3 | Math and Statistics Keys | display menus that access math, statistics, and other basic functions. |
| 4 | Scientific Keys | allow access to the capabilities of a standard scientific calculator—including trigonometric functions. |
| 5 | Number Keys | allow you to enter numbers. |
| 6 | Common Math Functions | allow you to divide, multiply, subtract, and add. |
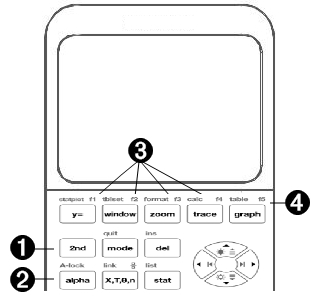
Function Keys
| 1 | 2nd | Access the second function printed to the left above each key. |
| 2 | alpha | Access the third function printed to the right above each key. |
| 3 | alpha f1-f4 | Access shortcut menus for fraction templates, n/d, quick matrix entry, select MATH menus, and VARS menu functions. |
| 4 | alpha f5 | Context-sensitive shortcut menu for interactive features or actions such as interactive drawing features from the graph screen or TI-Basic program editing. |
Using the Function Keys
Primary Function
The function appears on the key.
Ex: to display the MATH menu, press math.
Secondary Function
The function appears above the key in the same color as the 2nd key.When you press the 2nd key, the key name printed above the other key becomes active for the next keystroke.
Ex: to display the TEST menu, press 2nd and then test.
The flashing cursor becomes ↑ when you press 2nd. ↑ may also appear in the status bar.
Tertiary (Alpha Key) Function
The function appears above the key in the same color as the alpha key.
The third function allows you to enter alphabetic characters and special symbols, and to access SOLVE and shortcut menus.
Ex: to display the letter A, press alpha and then A.
- To enter several alphabetic characters in a row, press 2nd A-lock. This locks the alpha key in the ON position so that you avoid having to repeatedly press alpha. Press alpha again to unlock it.
- The flashing cursor becomes A when you press alpha. A may also appear in the status bar.
Setting the Display Brightness
Setting the Display Brightness
This section covers how to set the display brightness and explains automatic dimming.
Adjusting the Display Brightness
You can adjust the display brightness to suit your viewing angle and lighting conditions.
To adjust the brightness, follow these steps.
- Press 2nd ↓ to darken the screen one level at a time.
- Press 2nd ↑ to lighten the screen one level at a time. The TI-84 Plus CE retains the brightness setting in memory when it is turned off.
Automatic Dimming
The TI-84 Plus CE automatically dims the screen brightness after 90 seconds of inactivity.
- Press on to return the screen to the preset brightness.
- Pressing on to adjust the brightness will not affect any of the current state of your calculator work.
Setting Up the Calculator Modes
Mode settings control how the calculator displays and interprets:
- Answers
- Elements of lists and matrices
- Graphs
- Language settings
- Numbers
Setting Modes
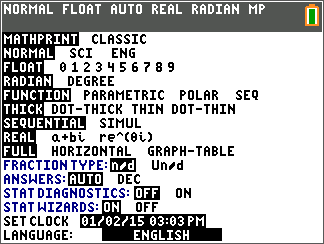
To set calculator modes, press mode. The following menu appears on your screen:
Note: When you press mode, the cursor is on NORMAL by default. Press ↑ to switch between MathPrint™ and Classic modes.
Note: The Constant Memory™ feature retains mode settings when the unit is turned off.
Changing Mode Settings
Changing Mode Settings
To change mode settings, follow these steps:
- Press ↓ or ↑ to move the cursor to the line of the setting that you want to change.
- Press → or ← to move the cursor across the line to the desired setting.
- Press enter to select a setting.
Exception: LANGUAGE Press → or ← to select a loaded language. Press ↓ or ↑ to set the selected language.
Note: The second line of the status bar displays context help with a description of line modes.
| Mode | Description |
| MATHPRINT CLASSIC | Controls whether inputs and outputs on the home screen and in the Y= editor are displayed as they are in textbooks |
| NORMAL SCI ENG | Numeric notation |
| FLOAT 0 1 2 3 4 5 6 7 8 9 | Number of decimal places in answers |
| RADIAN DEGREE | Unit of angle measure |
| FUNCTION PARAMETRIC POLAR SEQ | Type of graphing |
| THICK DOT-THICK THIN DOT-THIN | Resets all Y= line styles |
| SEQUENTIAL SIMUL | Whether to plot sequentially or simultaneously |
| REAL a+bi re^(qi) | Real, rectangular complex, or polar complex |
| FULL HORIZONTAL GRAPH-TABLE | Full screen, two split-screen modes |
| FRACTION TYPE: n/d Un/d | Displays results as simple fractions or mixed fractions |
| ANSWERS: AUTO DEC | Controls the format of the answers |
| STAT DIAGNOSTICS: OFF ON | Determines which information is displayed in a statistical regression calculation |
| STAT WIZARDS: ON OFF | Determines if syntax help prompts are provided for optional and required arguments for many statistical, regression and distribution commands and functions |
| SET CLOCK | Sets the time and date |
| LANGUAGE: ENGLISH | Sets the display language |
Error Conditions
Diagnosing and Correcting Error Conditions
The TI-84 Plus CE detects errors while performing these tasks:
- Evaluating an expression
- Executing an instruction
- Plotting a graph
- Storing a value
- Determine the error. The error screens give helpful hints about what may have happened, but the errors are not always fully explained.
- Correct the expression.
Diagnosing an Error
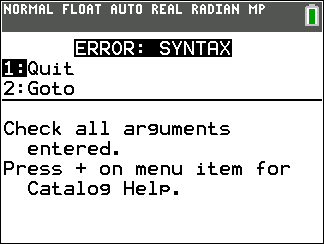
When the TI-84 Plus CE detects an error, it returns an error message with a short description.
| 1:Quit | Displays the home screen |
| 2:Goto | Displays the previous screen with the cursor at or near the error location |
Note: If a syntax error occurs in the contents of a Y= function during program execution, then the 2:Goto option returns to the Y= editor, not to the program.
Correcting an Error
To correct an error, follow these steps.
- Note the error type (ERROR:error type).
- Select 2:Goto (if it is available).The previous screen is displayed with the cursor at or near the error location.
- Determine the error. The error screens give helpful hints about what may have happened, but the errors are not always fully explained.
- Correct the expression.


